Arguments:
Ø
Simply we can call it as Parameter/data/value
Ø Used to pass data from Project to Project, Function to Function
Ø Dynamically pass/store the data
Ø Re-usability more, Time is less
Ø Having specific directions (In, Out,
In/Out, Property)
Creating Arguments
1. In the Designer panel, click Arguments.
The Arguments
panel is displayed

2. Click the Create Argument line. A new argument with the
default values is displayed.
Note: By
default, all arguments are of String type and have an
In direction.
Removing Arguments
- In the Arguments panel, select an argument
and press Delete.
- In the Arguments panel, right-click an
argument and select the Delete option

Example for Arguments:
- Create a new sequence.
- In the Arguments panel, create an argument,
StoreValue.
- From the Direction list, select Out,
and do not change the Argument Type from String.
- Add an Assign activity to the Designer
panel.
- In the Properties panel, in the To
field, add the StoreValue argument.
- In the Value field, type a string, such as
"How does one use an argument?".
The first project should look like in the screenshot below.

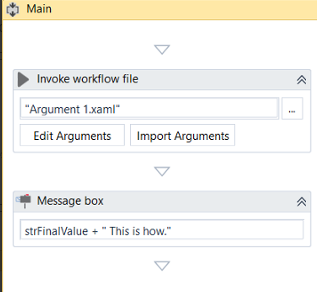
- Create a new sequence.
- Create a string variable, strFinalValue.
- Add an Invoke Workflow File activity to the Designer
panel.
- On the activity, click the Browse (…) button
and browse for the previously created sequence.
- Click Import Arguments. The Invoked
Workflow’s Arguments window is displayed. Note that the argument of
the first sequence is displayed here.
- In the Value field, add the strFinalValue
variable and click Ok. The argument is imported and the value from
it is going to be stored in the current project through the strFinalValue
variable.
- Add a Message Box activity under the Invoke Workflow File.
- In the Properties panel, in the Text field, type strFinalValue + " This is how", for example
The second automation should look like in the
screenshot below.
Press F5 in the second sequence. The automation is
executed correctly and the message box displays the desired text

Comments
Post a Comment
We appreciate your valuable Suggestions/Feedback